ASP.net with C#, Programming, K-POP, IT, Phone, iPhone,galaxy note 2,galaxy s3, lg optimus review.
2012년 11월 17일 토요일
2012년 11월 16일 금요일
팝업 오늘 그만보기 javascrpt
팝업 오늘 그만보기 javascrpt
[onedayPop.html]

<html>
<head>
<title>팝업창</title>

<script type="text/javascript">
<!--
function setCookie(name, value, expiredays) {
var today = new Date();
    today.setDate(today.getDate() + expiredays);

    document.cookie = name + '=' + escape(value) + '; path=/; expires=' + today.toGMTString() + ';'
}

function closePop() {
if(document.forms[0].todayPop.checked)
setCookie('blogWebCafe', 'rangs', 1);
self.close();
}
//-->
</script>

</head>
<body>

<form>
<input type="checkbox" name="todayPop" onClick="closePop()">
오늘 하루 그만보기
</form>

</body>
</html>

[index.html]

<html>
<head>
<title>팝업을 뛰우는 부모창</title>
<script type="text/javascript">
<!--
function getCookie(name){
var wcname = name + '=';
var wcstart, wcend, end;
var i = 0;

  while(i <= document.cookie.length) {
   wcstart = i;
 wcend   = (i + wcname.length);
 if(document.cookie.substring(wcstart, wcend) == wcname) {
  if((end = document.cookie.indexOf(';', wcend)) == -1)
   end = document.cookie.length;
  return document.cookie.substring(wcend, end);
   }

 i = document.cookie.indexOf('', i) + 1;

   if(i == 0)
  break;
  }
  return '';
}

if(getCookie('blogWebCafe') != 'rangs') {
 window.open('onedayPop.html','','width=250,height=200,top=0,left=0');
}
//-->
</script>
</head>
<body>

팝업을 뛰우는 창 입니다.

</body>
</html>
설명
cookie를 이용하기 위해서는 먼저 cookie를 저장해야 합니다.
cookie를 저장하기 위해서는 반드시 name 과 그리고 이와 쌍을 이루는 value 가 포함 되어야 합니다.


function setCookie(name, value, expiredays) { // 쿠키의 이름과 값 그리고 쿠키가 종료되는 날짜를 설정 합니다.
var today = new Date();
    today.setDate(today.getDate() + expiredays);
// 날짜를 설정하기 위해 setDate메소드를 사용하여 getDate의 "일"에 종료일 하루 "1" 을 더합니다.

    document.cookie = name + '=' + escape(value) + '; path=/; expires=' + today.toGMTString() + ';'
//쿠키를 저장시 이름과 값을 쌍을 이루고 그리고 쿠키를 사용한 문서의 위치를 정하고 종료일은 GMT 시간으로 합니다.
}

function closePop() { // 체크 박스에 체크시 쿠키이름과 값 그리고 종료일을 쿠키에 저장하고 창을 닫습니다.
if(document.forms[0].todayPop.checked)
setCookie('blogWebCafe', 'rangs', 1);
self.close();
}


이제 저장된 cookie 들로 부터 위에서 저장한 cookie 를 가져와 창을 띄울지를 결정합니다.

function getCookie(name){
var wcname = name + '='; // blogWebCafe 라는 쿠키 이름
var wcstart, wcend, end;   // 문자열을 추출하기 위한 변수를 선언 합니다.
var i = 0;

  while(i <= document.cookie.length) { // 쿠키의 문자열을 전부 검색 합니다.
  wcstart = i;
  wcend   = (i + wcname.length);
if(document.cookie.substring(wcstart, wcend) == wcname) { // 검색한 쿠키에  blogWebCafe와 동일한 문자열이 있다면
if((end = document.cookie.indexOf(';', wcend)) == -1)
// 마지막 부분을 구분자를 통해 검색하고 마지막이 아니라면 쿠키를 계속 검색합니다.(마지막에는 (;) 없습니다.)
end = document.cookie.length;
return document.cookie.substring(wcend, end); // rangs(value) 에 해당하는 문자열을 추출하여 리턴 합니다.
  }

i = document.cookie.indexOf('', i) + 1;

  if(i == 0)  // 모든 쿠키를 검색 했다면 while문을 제어 합니다.
break;
  }
  return '';
}

if(getCookie('blogWebCafe') != 'rangs') {
// getCookie에 blogWebCafe 를 매개로 해서 해당 쿠키를 찾고  rangs 라는 값이 없으면 팝업창을 실행 합니다.
 window.open('onedayPop.html','','width=250,height=200,top=0,left=0');
}
2012년 11월 15일 목요일
How to visual studio 2012 web publish? How to create Web Deploy packages in Visual Studio 2012
[visual studio 2012 web publish] How to create Web Deploy packages in Visual Studio 2012
When building Visual Studio 2012 we made an effort to reduce the amount of menu options which are shown on toolbars as well as context menus. If you have used any of the pre-release versions of VS 2012 then you might have noticed that theBuild Deployment Package and Package/Publish Settings context menu options are gone from Web Application Project.
In VS2010 when creating a Web Deploy package the publish dialog was not used because there were no relevant settings. Now that we have enabled features like integration to enable Entity Framework Code First migrations, incremental database updates (coming in the final release), connection string updates, etc. we needed to find a way that you could leverage these great features when creating Web Deploy packages. The solution that we decided to go with was to have first class support for creating packages directly from the publish dialog.
After that, we felt that it would be better to have a single way to create a package than two different ways with pros and cons. And we would benefit by being able to simplify our context menu. To create a package for your Web Application Project in VS 2012 (or in VS 2010 if you have the Azure SDK 1.7+) you can follow the steps below.
Web Deploy package Select.
- Right click on your project and select Publish
- Create a new profile for your Web Deploy package
- Specify the path where the package should go (must end with a .zip)
- Click Publish
After the initial create for the profile, creating additional packages is even easier. You just right click on your project select Publish and then click the Publish button.
The reason why we remove the context menu for the Package/Publish Settings is that most of the package and publish related settings are on the publish dialog. The existing settings from VS 2010 are still available on the property pages if you need to get to them.
One other change which we made was to hide the One Click toolbar. This is a toolbar which can be used to publish your web project in one click after the web publish profile has been created. After looking at the number of times that the button was used we determined that it did not meet the bar to be shown by default. Don’t worry if that was your favorite button (I know it was mine), you can bring it back quickly. The easiest way to turn it on is to press CTRL + Q (to bring up the quick launch), type in ‘one click’ and then click on the single result. That should show the One Click toolbar.
FYI if you want to learn more we have a great walk through on publishing a web project with an EF Code First model atDeploying an ASP.NET Web Application to a Windows Azure Web Site and SQL Database.
Samsung Galaxy Note 2 review - S-Pen Stylus
Samsung Galaxy Note 2 review - S-Pen Stylus
Samsung Galaxy Note II S-pen features. Very Good.
● 엔돌슨의 유튜브채널: 삼성 갤럭시노트2 의 팝업메모 사용하기
http://youtu.be/GNoGkrt-AgU
The S Pen in the Samsung Galaxy Note 2 sounds very similar to the one included in the Galaxy Note 10.1. The Note 2′s S Pen is 8mm thick, which is a bit thicker than the S Pen in the first Galaxy Note. The new S Pen also has a rubber tip, and has 1024 levels of sensitivity, just like the Galaxy Note 10.1. We hope the S Pen works better in the Note 2 than it does in the Note 10.1, though.
Samsung Galaxy Note II S-pen features. Very Good.
The reason the original Note caught the public imagination was its S-Pen stylus, which transformed the device from an oddball smartphone/tablet into something people wanted to work and play with. It all comes down to a combination of software and hardware, with Wacom providing digitiser technology to recognise the proximity of the stylus and sense the pressure with which it’s being applied (with support for up to 1,024 levels), while Samsung has provided software to harness these features to useful effect.
The stylus now resides in a slot at the bottom of the device, and it’s a slim but very manageable effort with a nice, rounded profile. The Note 2 actively recognises when you’ve pulled the stylus from its sheath and takes you to a gallery of templates for the S Note note-taking app, where you can doodle, list or annotate to your heart’s content.
The app has some very smart handwriting recognition technology built in, which did an impressive job of converting the scrawl that once appalled my teachers into normal text (albeit with the assistance of some heavy autocorrect), and while you couldn’t mistake S Note for an art package, there are enough line and colour options to keep most doodlers busy in their next endless meeting. There’s also a neat screen recorder function, so that you can watch your notes and annotations appearing later in the order that you added them.
● 엔돌슨의 유튜브채널: 삼성 갤럭시노트2 의 팝업메모 사용하기
AirView is a new way to view information hidden in a menu without actually opening the content by hovering. For example, by hovering the S Pen over a date in S Planner users can see all of their events for that day. The mode can also show a preview of content in a video by hovering over the timeline of the video.
The S Pen in the Samsung Galaxy Note 2 sounds very similar to the one included in the Galaxy Note 10.1. The Note 2′s S Pen is 8mm thick, which is a bit thicker than the S Pen in the first Galaxy Note. The new S Pen also has a rubber tip, and has 1024 levels of sensitivity, just like the Galaxy Note 10.1. We hope the S Pen works better in the Note 2 than it does in the Note 10.1, though.
2012년 11월 14일 수요일
how to very slow to load large list of options in SELECT element maker.
how to very slow to load large list of options in SELECT element maker.
Marker Option list.
var html = "";
while(loop)
{
html += "<option value='"+list[i] + i+"'>"+list[i]+"</option>";
}
$(numberList).html(html);
issue :http://stackoverflow.com/questions/9639703/ie8-javascript-very-slow-to-load-large-list-of-options-in-select-element
Marker Option list.
var html = "";
while(loop)
{
html += "<option value='"+list[i] + i+"'>"+list[i]+"</option>";
}
$(numberList).html(html);
My guess is that that particular DOM operation is just really slow in IE8. In general, manipulating the DOM is the slowest type of operation in any browser. To get around that I typically try to find ways to combine my changes into one DOM update (e.g. add an HTML "batch" of 6000 rows to a table instead of individually adding 6000 rows to a table).
In this example the only way to do that would probably be to create all of the
<option> elements as HTML and then use innerHTML to insert them into the <select>. See this jsfiddle example:http://jsfiddle.net/pseudosavant/bVAFF/
I don't have IE8 to test with, but it is much faster even in Firefox (22ms vs 500ms) for me.
Update
Looks like it didn't work with
innerHTML in IE for loading the list, but it did work for clearing it. Loading it works using jQuery $(o).html(html); though. I updated the jsfiddle example and it works in IE9, and hopefully IE8 now.Javascript:
$(document).ready(function(){
    loadListBatch();
});

function loadListBatch() {
    clearListBatch();
    var start = new Date().getTime();
    var o = document.getElementById("listLookupAvailableItems")
    var html = "";
    for (var i = 0; i < 6000; i++) {
        html += "<option value='"+'XYZ' + i+"'>"+'XYZ ' + i+"</option>";
    }
    // o.innerHTML = html; // Only one DOM operation, but still doesn't work in IE
    $(o).html(html); // Using jQuery to insert the HTML makes it work with IE
    console.log('Load time: ' + (new Date().getTime() - start));
}

function clearListBatch() {
    var start = new Date().getTime();
    document.getElementById("listLookupAvailableItems").innerHTML = ""; // It was already only one DOM call, but this is faster it seems.
    console.log('Clear time: ' + (new Date().getTime() - start));
    return false;
}
issue :http://stackoverflow.com/questions/9639703/ie8-javascript-very-slow-to-load-large-list-of-options-in-select-element
2012년 11월 13일 화요일
sharepoint 2010 client object model javascript list item ListEnumerator count
how to sharepoint 2010 client object model javascript list item ListEnumerator count
Result -
In this post you will learn about how to retrieve all the items from a list using ECMA\JavaScript client object model, and also how to enumerate through them. The code below will retrive items from all folders and sub-folders as well. To retrieve items from a specific folder see the post Here
For below script, I have used a custom list ‘Testlist” which has columns (“Title and Department”) and has three list items.
You can copy and paste the below script in a Content editor webpart for testing purposes.
my demo source.
return SharePoint List item Count !
function ViewItem() {
var context = new SP.ClientContext.get_current();
var web = context.get_web();
var list = web.get_lists().getByTitle('test'); //list name
var query = SP.CamlQuery.createAllItemsQuery();
allItems = list.getItems(query);
context.load(allItems);
context.executeQueryAsync(Function.createDelegate(this, this.success), Function.createDelegate(this, this.failed));
}
function success() {
var count = allItems.get_count();
alert(count);
}
function failed(sender, args) {
alert("failed. Message:" + args.get_message());
}
Please Note : You might need to fix the quotes ” & ‘ after you copy the below code.
<script src="/_layouts/SP.js" type="text/ecmascript"></script><script type="text/javascript">
function ViewItem()

{

var context = new SP.ClientContext.get_current();

var web = context.get_web();

var list = web.get_lists().getByTitle('Testlist');

var query = SP.CamlQuery.createAllItemsQuery();

allItems = list.getItems(query);

context.load(allItems, 'Include(Title,Department)');

context.executeQueryAsync(Function.createDelegate(this, this.success), Function.createDelegate(this, this.failed));

}

function success() {

var TextFiled = "";

var ListEnumerator = this.allItems.getEnumerator();

while(ListEnumerator.moveNext())

{

var currentItem = ListEnumerator.get_current();

TextFiled  += currentItem.get_item('Title') + '-' +currentItem.get_item('Department') + '\n';

}

alert(TextFiled);

}

function failed(sender, args) {

alert("failed. Message:" + args.get_message());

}

</script>
<a href="#" onclick="Javascript:ViewItem();">View Items</a>Result -
how to Rdpclip.exe mstsc, Copy and Paste is not working on my Remote Desktop Connection… what’s wrong?
The process known as RDP Clip Monitor belongs to software Microsoft Windows Operating System or Sistema operativo Microsoft Windows or Betriebssystem Microsoft Windows by Microsoft(www.microsoft.com).
Description: rdpclip.exe is located in the folder C:\Windows\System32. Known file sizes on Windows 7/XP are 62,464 bytes (56% of all occurrences), 69,632 bytes, 62,976 bytes, 44,032 bytes or 54,272 bytes. 
It is a Windows core system file. The program is not visible. It is a trustworthy file from Microsoft. Therefore the technical security rating is 6% dangerous, however also read the users reviews.
If problems with Hotfix for Microsoft .NET occur, you can also remove the entire program using Windows Control Panel.
Luckily fixing the issue is pretty straightforward and involves a few simple steps.
- Load up task manager (right click taskbar and select Task Manager)
- Go to the Processes Tab
- Select rdpclip.exe
- Click End Process
- Go to the Application Tab
- Click New Process
- Type rdpclip
- Click Ok
터미널서비스 클라이언트에서 CTRL+C , V 클립보드의 복사 붙여넣기 안될때.
이 문제를 해결하려면:
- Ctrl + Shift + Esc를 눌러 터미널 서버에서 작업 관리자를 시작하고 Rdpclip.exe 프로세스가 실행 중인지 확인하십시오. 참고 기본적으로, 컴퓨터를 시작할 때 이 프로세스를 시작해야 합니다.
- 관리 도구에서 터미널 서비스 구성 스냅인을 시작하십시오.
- RDP-TCP 연결 아이콘을 마우스 오른쪽 단추로 속성 다음 클릭하십시오.
- 사용 권한 탭을 클릭하십시오.
- 터미널 서버에 로그온한 일반 사용자를 나타내는 사용자 아이콘을 클릭하고 고급 을 클릭하십시오.
- 사용자 를 누른 다음 보기/편집 .
- 대화 상자에서 RDP-Tcp 권한 항목 열립니다. 가상 채널 항목에는 허용 열에서 검사 거부 열에 검사 없는 확인하십시오. 확인 을 클릭하십시오.
- 나머지 대화 상자를 모두 닫힐 때까지 확인을 합니다.
How to consume web services in SandBox solution?
How to consume web services in SandBox solution?
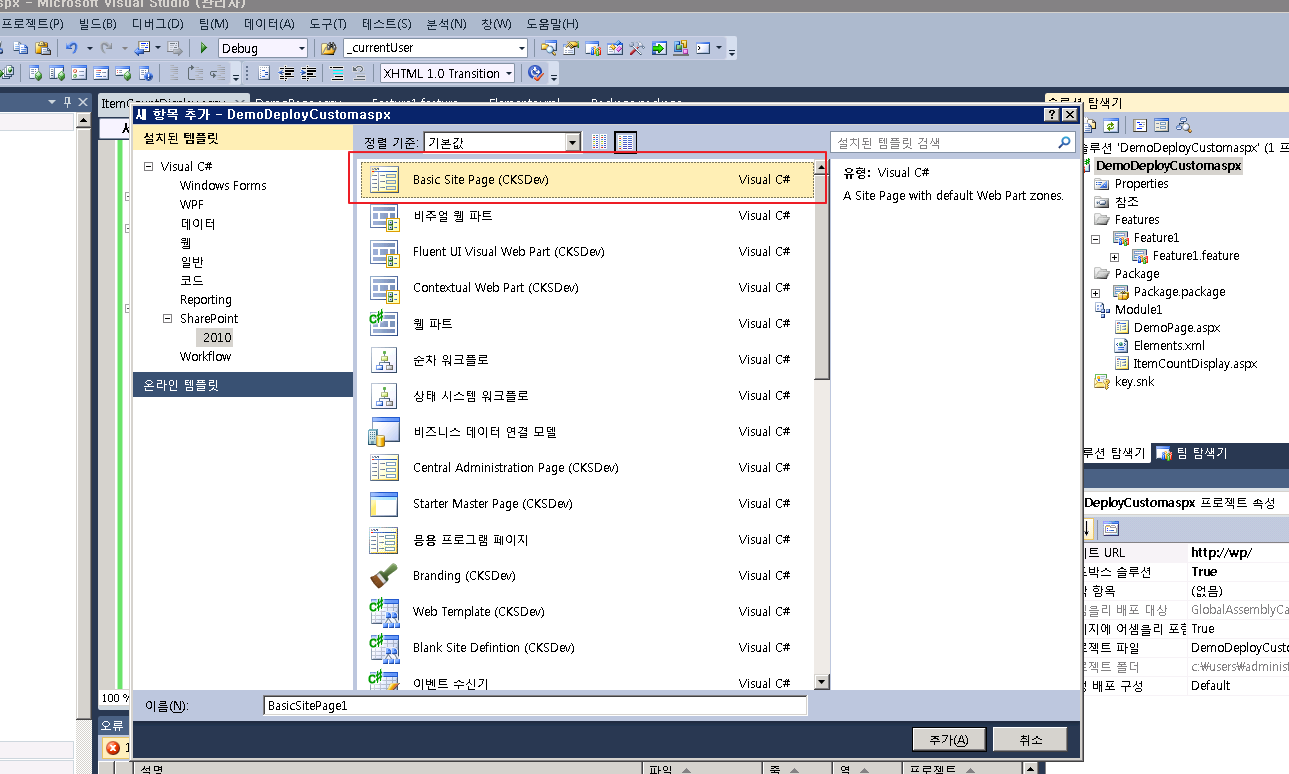
CKS - Development Tools Edition (Server)를 설치한다.
다운로드
http://visualstudiogallery.msdn.microsoft.com/ee876627-962c-4c35-a4a6-a4d89bfb61dc

모듈을 생성후 Custom Page(.aspx) 를 추가합니다. 이렇게 하는 건 쉐어포인트 (샌드박스솔루션)에서 별도의 웹서비스를 호출하기 위한 방법입니다. 팜솔수션은 별도의 웹서비스와 서버랭기지를 사용할 수 있지만, 서버단위로 배포되기 때문에 샌드박스 솔루션을 사용합니다.
모듈에 별도의 aspx 페이지를 추가합니다. 내용을 다 지운다.
별도의 웹페이지에서 Jquery 를 이용해서 웹서비스를 호출합니다.
위의 코드와 같이 Jquery 를 추가하고 웹서비스를 호출하여 옵니다.
단, 웹서비스는

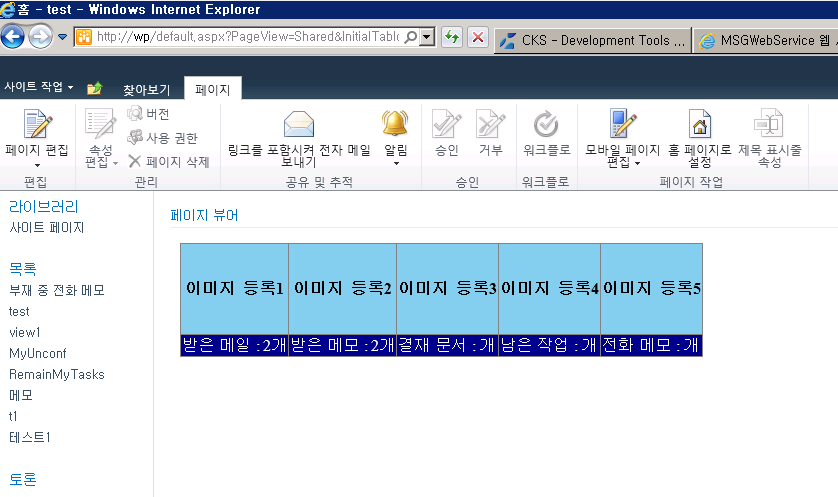
CKS Dev 로 생성된 웹사이트를 쉐어포인트로 배포합니다.
실재로 CKS를 이용한 ECMAScript 등은 추후 강의에서 작성하여 드리겠습니다.

Jquery 를 이용하여 웹서비스 정보를 쉐어포인트에서 쉽게 가져올 수 있습니다.
CKS - Development Tools Edition (Server)
FreeThe SharePoint 2010 Visual Studio 2010 Extensions project (CKSDEV) is a collection of Visual Studio templates, Server Explorer extensions and tools providing accelerated SharePoint 2010 development based on Microsoft's new SharePoint 2010 development tools.
다운로드
http://visualstudiogallery.msdn.microsoft.com/ee876627-962c-4c35-a4a6-a4d89bfb61dc

모듈을 생성후 Custom Page(.aspx) 를 추가합니다. 이렇게 하는 건 쉐어포인트 (샌드박스솔루션)에서 별도의 웹서비스를 호출하기 위한 방법입니다. 팜솔수션은 별도의 웹서비스와 서버랭기지를 사용할 수 있지만, 서버단위로 배포되기 때문에 샌드박스 솔루션을 사용합니다.
모듈에 별도의 aspx 페이지를 추가합니다. 내용을 다 지운다.
별도의 웹페이지에서 Jquery 를 이용해서 웹서비스를 호출합니다.
- <%@ Register Tagprefix="SharePoint" Namespace="Microsoft.SharePoint.WebControls" Assembly="Microsoft.SharePoint, Version=14.0.0.0, Culture=neutral, PublicKeyToken=71e9bce111e9429c" %>
- <SharePoint:ScriptLink language="javascript" name="SP.js" defer="true" runat="server" Localizable="false"/>
- <html>
- <meta http-equiv="Content-Type" content="text/html; charset=utf-8">
- <head>
- <script type="text/javascript" src="http://ajax.googleapis.com/ajax/libs/jquery/1.4.2/jquery.min.js"></script>
- <script type="text/javascript">
- $(document).ready(function () {
- getWebProperties();
- serviceCall('divResult2');
- });
- 생략
- function serviceCall(divid) {
- var WSurl = 'http://도메인/WebService.asmx/getListData'
- var param = "{'listname':'받은메모', 'url':'http://gw.domain.com', 'email':'demo1@domain.co.kr','pwd':'0000'}"
- $.ajax({
- type: "POST",
- url: WSurl,
- data: param,
- contentType: "application/json; charset=utf-8",
- dataType: "json",
- success: function (msg) {
- $("#" + divid).html(msg.d);
- },
- error: function (e) {
- $("#" + divid).html("WebSerivce unreachable");
- }
- });
- }
위의 코드와 같이 Jquery 를 추가하고 웹서비스를 호출하여 옵니다.
단, 웹서비스는
[System.Web.Script.Services.ScriptService] 를 허용하여 줍니다.
- public class WebService1 : System.Web.Services.WebService
- {
- [WebMethod]
- public string TestMethod(String data)
- {
- return data;
- }

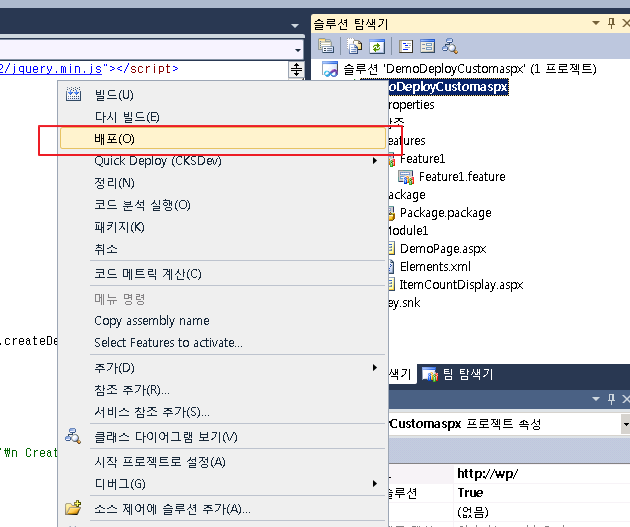
CKS Dev 로 생성된 웹사이트를 쉐어포인트로 배포합니다.
실재로 CKS를 이용한 ECMAScript 등은 추후 강의에서 작성하여 드리겠습니다.

Jquery 를 이용하여 웹서비스 정보를 쉐어포인트에서 쉽게 가져올 수 있습니다.
피드 구독하기:
덧글 (Atom)


